Showing posts with label 1890s. Show all posts

18/01/2018

Petticoats and Bustle Pads

Hello everyone!

I thought I´ll sew some undergarments as they go relatively quickly before I start working on another major sewing project. So, here they are! :)


First one is 18th century basic under petticoat. I loosely based the design on the one in a book The American Duchess Guide to 18th Century Sewing, except I made the closure differently. On each side is a gap for easy access to pockets and front ties tie up in the back and back ties tie up in the front. As a material for the petticoat I used some heavy weight linen blend I had in my stash. Originally I planned to sew cat beds from it but well... Second picture shows front view of a Bum Pad. Pattern I used for it is from Simplicity: 8162. Material for this Bum Pad and other two Bustle Pads in this post was a cotton drill remnant from my Imperial Tournure.


Side and back view of the Bum Pad.


Then I (finally) made 1880´s Winter Petticoat! It is made in flannel (cotton). Pattern I used is from Truly Victorian: TV170, View3 - Late Bustle. First picture shows the petticoat worn over Imperial Tournure and second over Bustle Pad that is shown below. I like the first silhouette better but Bustle Pad is somewhat more practical for everyday wear. 


Side-back view of the petticoat worn over a Bustle Pad.


As the fabric is printed it doesn´t show easily on a photograph, but I sewed all tucks on a flounce that the pattern suggested. This way the flounce stands out nicely.


1870´s-1880´s Bustle Pad on it´s own. As stuffing I used my discarded clean nylon stockings that had holes in them. I cut them to small pieces first. I don´t remember exactly how many there were, but there was a full bag of them. I filled with them all three pads I made and I almost run out of them. Makes one think what a foolish investment nylon stockings are. Certainly not durable at least in my case... I learned my lesson and I plan to purchase in the future only silk, cotton and wool stockings.


Back view of the Bustle Pad.


Small Bum Pad for 1890´s to Edwardian era skirts. The purpose of this pad is to fill the hollow lower back and create more round behind. :)


Back view of the Bum Pad.


Bum Pad worn under Edwardian Petticoat which I forgot to iron before taking the picture. Sorry! 

Thank you for reading and see you next time!

22/12/2017

Winter Capes

Hello everyone! 

I needed a winter cape as modern coats won´t fit over a bustle nor big skirts. So I made three capes! One needs a variety don´t you think? ;) 

First one is 1890´s cape made in boucle wool fabric. I don´t know if you can see it but the shine is gold. I love gold! Large black/gold bows are made from velvet fabric. The inspiration for the bows was from a fashion plate from 1890´s. Cape closes with buttons and loops and is fully interfaced with fleece for warmth. The pattern is self drafted but inspired by one in a book Making Victorian costumes for Women by Heather Audin.

Side view of the cape.

Side view of the cape.

Detail of the bows and neckline.

Second one is Talma made in beige wool and embellished with gold tassels. Yeah, gold again... The pattern is from Truly Victorian (Talma Wrap). It´s perfect for 1870´s and 1880´s as it fits over a bustle. It fastens in front with buttons and it has a waist tape to make it snug over the back. This Talma is also interfaced with fleece for warmth and lined with viscose satin lining.

Side and back view of Talma.

Button closures.

Detail of the back and tassel trim.

And the third cape is Evening Cape made in two cohesive off-white wool fabrics and embellished with white guipure lace and crystals and sequins. All crystals and sequins are hand sewn. The cape is flat-lined with viscose-satin lining. No fleece for this one. The pattern is from Lynn McMasters (19th Century Evening Cape) and fits for years 1885-1895. I am happy with the outcome but I have to say the pattern needs adjusting. Sleeve caps were supposed to be gathered into armhole to form a small puff on top but no gathering was needed as the sleeves fitted perfectly. I would have liked the small puff. Well, next time then...

Detail of  collar and frog closures. I also used large hooks and eyes below frog closure.

Side view of the cape.

Back view of the cape.

Detail of the trim and sequin/crystal embroidery.

Matching muff for the cape. Center lace panel is hand embroidered with sequins.

Detail of the muff.

I still have to make hats for these capes and maybe some more muffs... 

That´s all for today, thank you for reading! Merry Christmas and Happy New Year! :)

15/12/2017

1890´s Purple/green Day Dress

Hello again!

My next project I wanted to share with you is 1890´s Day Dress. I made it in early autumn. The idea for this dress started with cream floral quilt-weight cotton I had in my fabric stash. I absolutely love this fabric with purple flowers and yellow-green leaves (which is my favorite shade of green). The fabric piece was too small for anything big but I knew I wanted to pair it with other fabrics anyway. Next I found this rich purple cotton velvet in my stash, which was the perfect shade. That´s when I knew the silhouette and type of dress I wanted to make. All that was missing was skirt fabric. So I got  a green taffeta with most beautiful sheen.

Preview of the 1890´s Day Dress. Bodice is flat-lined and fully boned with 5mm spiral steel boning. It fastens in front with hooks and eyelets, buttons are purely decorative. 

Mutton leg sleeves assembled and ready to be inserted. I used for these sleeves pattern by Laughing Moon (LM103). 

Skirt hem ruffle before ironing, 6,5 meters of it!

Sewing the hem ruffle on my Singer 221K Featherweight. It took some serious measuring and precision to get the pleats even. After attaching the ruffle to the skirt I hand-sewed notches on all pleats to keep the purple lining visible. Two notches per pleat.

Front view of finished 1890´s Day Dress.  Again please excuse the silhouette of the skirt. I haven´t yet made the appropriate 1890´s petticoat to give it the proper flare.  

Side and back view of the dress.

Detail of the back.

Finished hem ruffle.

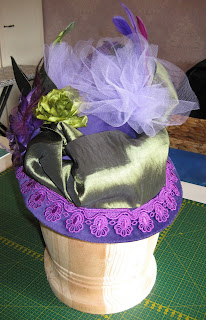
Accompanying hat to the dress. This is one of my favorite hats. It is a Bustle era hat and the pattern is from Lynn McMasters. Embellishments are my own. These hats were still worn in first half of 1890´s so it is appropriate for the dress. The inspiration for this hat were hats in the show Lizzie Borden Chronicles which has probably the best costumes ever.

Side and back view of the hat.

Then I made Victorian underbust corset. I drafted the pattern from Dore Corset pattern (overbust) by Laughing Moon. This is a one layer corset in jacquard coutil with wide spring steel busk. I will have to get a better photo of this.

Detail of a modesty panel in the back.

Edwardian hat referred to as a Togue. The pattern was from a book Making Edwardian Costumes for Women by Suzanne Rowland. It is a reproduction hat. The frame is made of wires and then netting is applied over it. Trim is all hand-stitched using net, knitting yarn and gold trim. 

Side view of the togue with organza flower made by me.

This hat reminds me of Dowager Countess of Grantham from Downton Abbey. The colors fits as well! Now I still have to make a dress or cape or dress & cape to go with it.

Thank you for reading and have a nice weekend!

01/12/2017

Autumn Sewing

Hello everyone!

I have been really busy sewing and embroidering all autumn. Now that it´s 1st of December, I thought I will show you what I have been up to this autumn. :) And then I should probably start working on some Christmas items I have been planning to do...

First project is 1890´s Walking Dress:

Here are the materials I used for my 1890´s Walking Dress: dark purple lace, mauve taffeta, dark purple cotton velvet, beige/purple plaid, beige satin, mauve floral jacquard, dark purple lining fabric and mustard cotton which I used for lining the bodice. Dottie approved all of them. :)

Front and side view of finished dress. I haven´t yet made 1890´s petticoat so please excuse the silhouette of the skirt. The petticoat will give it it´s flare at the bottom. It is on my "To do" -list. ;)

The sleeves are Mutton Leg Sleeves and I used Laughing Moon´s pattern (LM103) for them. I adjusted the cuffs and made them pointy in the back. The bodice pattern I´ve drafted myself. Front opening closes with hooks and eyelets. Buttons are for decoration only.

I made a reticule form cotton velvet with metal clasp. The floral motif is embroidered by machine.

Back view of the dress with machine-embroidered sash made from beige satin. I took an inspiration for the sash from the book Victorian Fashions by Carol Belanger Crafton.

Detail of the sash. The black border is hand crochet by me using cotton crochet yarn. I also made the tassels using the same yarn in orange and black. I love the colors, very autumn, very Halloween! 

Hem of the skirt.

Since this is an autumn outfit it needs an outer-garment- a cape! Which were ever so popular during this period. The pattern is from Truly Victorian (1890s Cape). Standing collar is wired with heavy-weight millinery wire. Dark purple lace fabric is applied over the plaid fabric to give it interesting detail and to make it more cohesive with the dress.

Front and detail view of the cape. I still have to make a hat to go with this piece. 

Side and back view of the cape worn with the dress underneath.

This purchased velvet bag I had for ages and it was stored away and unused. I remembered it and dug it up. I embroidered the motifs on a machine, added lace trim and gold tassels and it´s back in the game! 

I made this Halloween table-runner from quilt-weight cotton fabrics. I love it! Two machine-embroidered designs on big squares and smaller squares.

Detail of first embroidery- Skeleton Unicorn from Urban Threads. I framed the design with some decorative stitches.
Detail of second embroidery- Pumpkin and Squash from Embroidery Library. Both designs were free in October. And they got me completely crazy about machine embroidery. I had an embroidery machine for two and half years and only used it a couple of times to embroider reticules. For those I used designs that came with the machine. But now that I discovered what gorgeous designs are out there, I will definitely embroider on it more!

Other view of the table runner.

I had to get these silly lanterns! Maybe you can tell I love Halloween. ;)

And some more machine embroidery. Our cushions were rather faded and after seeing these designs I had to embroider them. These are from Embroidery Library and they took ages to make. I have set my machine almost at a slowest embroidery speed to not to put excess stress on it. This way I hope it will serve me longer. Each of these designs took about 4 hours to embroider and that´s only embroidering time, when you add thread changes ( about 38-48 thread changes per design), each design took me whole day to make. But they were well worth it.

Geisha appreciating new cushion.

 Witch´s Hat and Too Cute to Spook designs in detail.

Witch´s Boot design in close view.

And I was so excited about Halloween I made this hexagon bag from the same fabrics I used for the table runner. Whole bag is hand-stitched. There were still some fabrics left so I started to work on hexagon quilt, but that will be finished later...

Back view of the bag.

Bedroom needed new cushions as well. These are from Urban Threads. 

His Skeleton Cameo- Baroque style embroidery design. Both cushions are 40 x 40 cm.

And Hers Skeleton Cameo design. These two almost took entire spool of obsidian embroidery thread (500 meters)!

Thank you for reading and see you soon! :)