Showing posts with label Singer 201K. Show all posts

11/02/2018

1880´s Halloween Dress and Winter Talma

Hello everyone!

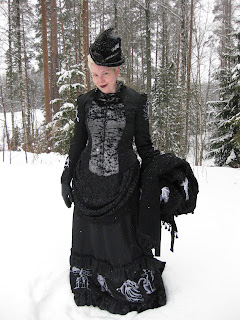
I didn´t get around taking photos of my new 1880´s Halloween Dress and matching winter Talma in autumn but now we´ve taken them, so here they are! The dress and talma were sewed last autumn and the hat last month. Both dress and talma feature extensive machine embroidery.

Here I´m holding the talma in my hand so that the bodice of the dress is visible. It was -4 degrees Celsius and I managed just fine. :)


For the bodice I used pattern by Truly Victorian- TV463 1884 French Vest Bodice. It has machine embroidery on back and both sleeves. Halloween embroidery designs are from Urban Threads: Halloween Glow and Wolf Trio. Skirt hem is embroidered with designs from Embroidery Library: Autumn Glow and Urban Threads: Halloween Glow and Flickering Feline. All the designs are embroidered entirely with Glow In The Dark thread. Skirt and overskirt are drafted by me. Skirt is worn over Imperial Tournure and Winter 1880´s Petticoat.


Details of embroidery on the hem of the skirt.


And here is the Talma worn over the dress. Pattern I used for this is again by Truly Victorian- TV500 Talma Wrap. I love it! Talmas, dolmans and capes are my favorite outerwear. They are so easy to put on and off without distorting the dress etc. Back and edges are edged with decorative tassel trim. Talma is machine embroidered with designs from Urban Threads: Ghost Baroque using viscose machine embroidery threads. I must admit that these designs gave me the idea for this Talma in the first place. :)

Detail of the hat. Pattern for this hat is by Lynn McMasters- Late Victorian Tall Hat. I made the crown in size Small because I´m quite tall myself. The bird is not real, it is a millinery bird made in Styrofoam and covered in feathers. Curved brim was a fun challenge to make. My husband helped me to make the brim-base for blocking the buckram from Styrofoam wreath.

Dragon embroidery on the back.

Another detail of the hat. <3

Talma embroidery: Pumpkin and Bird Skull.

Tree and Rose.

Ghost and Ghost Witch. The witch was a separate design and not a part of Ghost Baroque design pack.

Raven and Bat.

Dragon Smoke, also a separate design, not a part of Ghost Baroque design pack.

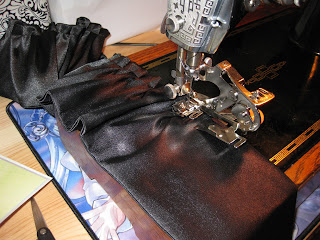
Sewing 9 meters of ruffles for the skirt on my Singer 201K using ruffler foot for the first time. Brilliant device! I shall use it more often now that I know how it works. :)

Thank you for reading and see you next time! :)

31/01/2016

Cocoon Coat

Hello everybody!

I´m back! :) I´ve been really busy in autumn and didn´t get around to post here. When it comes to my handicrafts, I've been mostly knitting and crocheting. Not so much sewing. I will try to update the projects I've made as I get the pictures taken. 

But now I'm all excited (again) sewing my own wardrobe! :) The winter came to Finland (finally) and I only have one proper winter coat I have sewn couple of years ago. I don´t count the coats I´ve got from the High Street since they´re not what I call proper. ;) I have had fabrics and supplies for his coat for a while but didn´t get around to sew it. Sewing winter coats can be a laborious project, especially if you put in interlining as well as lining. My main fabric was quite thin so I've decided to put in a warm fleece-interlining. The pattern for this coat is from Burda 10/2013 magazine.


I sewn the outer layer (main fabric) on Agatha using ultra glide foot a.k.a. teflon foot. The fabric wasn´t feeding evenly with the regular straight stitch foot. 

I´ll take you through how I assembled the coat after finishing sewing three layers separately. 
1. Outer layer of main fabric
2. Fleece-interlining
3. Taffeta-lining


Here´s the outer layer turned inside out. 
Tip! Pull pockets inside out so they don´t get accidentally caught into stitching (not seen on the picture).


Fleece-interlining pulled over the outer layer and under facings (for about 1,5 cm which equals the seam allowance), wrong sides together and pinned in place. Tip! Hem and bottom of the sleeves of the outer layer has 4 cm seam allowance. For fleece-interlining cut hem and bottom of the sleeves with no allowance to avoid any bulk.


Detail of the back of neck with silver pins. Facings are pulled over the interlining.


Facing hand-stitched to fleece-interlining only. The outer layer must not get caught into this stitches for it will pull and be ugly!


Taffeta-lining pulled over the fleece-interlining, wrong side down and pinned in place. All seams must be lined to get a perfect fit.


Detail of the pinning.


Lining hand-stitched in place again only into facings and not all the way through the coat.


Front and 3/4 view of the finished coat. I love the outcome! Great pattern! This is first coat of cocoon shape I have ever had. Quite strange but fun! The coat narrows down and widens in the middle. There is plenty of room for thick knitted pullover if weather requires it. :)


Side and back view of the finished coat.

Thanks for viewing, see you next time! :)

25/09/2015

Maxi Dresses & Army Shirt


 First lot of my early autumn sewing projects. :)


Maxi dress made in satin fabric. The pattern is from Burda 4/2014 magazine. I sewn this dress as a birthday gift for my sister. She picked the pattern and fabrics herself. This is the second dress I made using this pattern, you can see the first one in here. This dress is sewn on Henrietta, overlocked on Bebe and hemmed on Cornelia


Front and side view of the bodice.


Back view.


Happy owner of the dress. :) My sister <3


My sister is a talented musician and she can wear this dress for her concerts as well as for casual events.


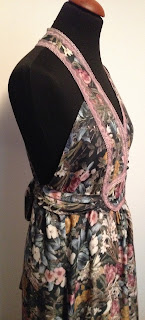
Another maxi dress for myself this time. I had this viscose fabric for this dress for a while and didn´t get to sew it. When I was starting to sew dress for my sister, I figured why not sew this one simultaneously? Having a few machines I don´t have to change the thread color for another project so it was easy sewing them along. This one is sewn on Agatha.


Front and side view of the bodice.


Back view.


Men´s army shirt in medium weight fabric for heavy use. The pattern is from the book Burda Style- Sewing Vintage Modern. This is a modern interpretation on men´s 1940´s shirt. I really enjoyed sewing this one, so many intricate details! :)


Shirt is hemmed on Cornelia with 3 different shades of thread to give the stitching ombre effect.


1940´s collars were so much more stylish then modern tiny ones! :)


Slip dress made in stretch-satin fabric with lace trims. The pattern is from Burda 7/2013 magazine. Slippery stretch-satin fabric was a bit difficult to work with, especially delicate shoulder straps. I made this dress to be worn underneath sheer dresses.


 Lace trim detail.


Stretch-satin top from the same magazine as the slip dress. This top is meant to be worn underneath sheer blouses that I love! I have quite a few chiffon fabrics in my stash waiting to be sewn. Both slip dress and top were sewn on Fiona.


Autumn coat made in college fabric. The pattern is from Burda 9/2013 magazine. I absolutely had to buy this fabric, the print is so beautiful! This coat is sewn mainly on Bebe and details such as pockets are sewn with Henrietta.