Showing posts with label attachments. Show all posts

11/02/2018

1880´s Halloween Dress and Winter Talma

Hello everyone!

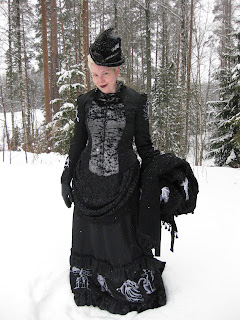
I didn´t get around taking photos of my new 1880´s Halloween Dress and matching winter Talma in autumn but now we´ve taken them, so here they are! The dress and talma were sewed last autumn and the hat last month. Both dress and talma feature extensive machine embroidery.

Here I´m holding the talma in my hand so that the bodice of the dress is visible. It was -4 degrees Celsius and I managed just fine. :)


For the bodice I used pattern by Truly Victorian- TV463 1884 French Vest Bodice. It has machine embroidery on back and both sleeves. Halloween embroidery designs are from Urban Threads: Halloween Glow and Wolf Trio. Skirt hem is embroidered with designs from Embroidery Library: Autumn Glow and Urban Threads: Halloween Glow and Flickering Feline. All the designs are embroidered entirely with Glow In The Dark thread. Skirt and overskirt are drafted by me. Skirt is worn over Imperial Tournure and Winter 1880´s Petticoat.


Details of embroidery on the hem of the skirt.


And here is the Talma worn over the dress. Pattern I used for this is again by Truly Victorian- TV500 Talma Wrap. I love it! Talmas, dolmans and capes are my favorite outerwear. They are so easy to put on and off without distorting the dress etc. Back and edges are edged with decorative tassel trim. Talma is machine embroidered with designs from Urban Threads: Ghost Baroque using viscose machine embroidery threads. I must admit that these designs gave me the idea for this Talma in the first place. :)

Detail of the hat. Pattern for this hat is by Lynn McMasters- Late Victorian Tall Hat. I made the crown in size Small because I´m quite tall myself. The bird is not real, it is a millinery bird made in Styrofoam and covered in feathers. Curved brim was a fun challenge to make. My husband helped me to make the brim-base for blocking the buckram from Styrofoam wreath.

Dragon embroidery on the back.

Another detail of the hat. <3

Talma embroidery: Pumpkin and Bird Skull.

Tree and Rose.

Ghost and Ghost Witch. The witch was a separate design and not a part of Ghost Baroque design pack.

Raven and Bat.

Dragon Smoke, also a separate design, not a part of Ghost Baroque design pack.

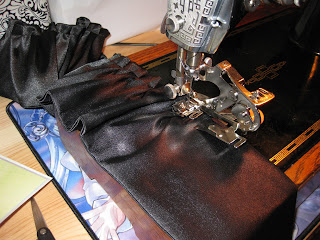
Sewing 9 meters of ruffles for the skirt on my Singer 201K using ruffler foot for the first time. Brilliant device! I shall use it more often now that I know how it works. :)

Thank you for reading and see you next time! :)

10/01/2017

Victorian Corset

I finally got around sewing my Victorian corset! Corset is such an important undergarment for historical sewing as it alters the figure a bit and you should always take measurements for historical sewing wearing the undergarments needed for the outfit. 

Here are the supplies I used for this project:

Victorian Corset pattern by Laughing Moon (LM100), I made The Dore Straight Seam Corset. Pattern also includes another corset- The Silverado Bust Gore Corset , a pattern for chemise with three sleeve-alterations and a pattern for open drawers. As main fabric I used heavy cotton drill with no stretch what so ever. For lining I used plain cotton of quilt-weight. Straight busk, 7mm spiral boning, 7mm spiral wire end caps, brass eyelets, boning tape which I didn´t use, cotton tape for waist reinforcement, bias-binding, lace trim, satin tape. 

Pattern cutting with Lupi´s assistance. :) I altered the pattern a bit, added length as I´m tall and some basic fit-adjustments. I got plenty of fabric left, at least for one more corset. I was thinking of dying the fabric. 
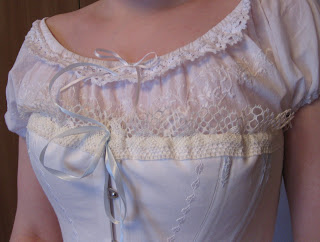
I top-stitched a line of decorative stitching on my machine with viscose machine embroidery thread onto both fronts. It is in white so it blends into main fabric a bit. But the light catches the sheen nicely.
Tools for making eyelets: tape-measure, chalk pen, small scissors, leather punch, eyelets and eyelet-pliers. 
Setting the eyelets densely, 17 eyelets per side. I must say I really liked working with pliers, it is so much easier than hammering them and the outcome is smooth. Unlike the hammered ones that always had one side flatter than the other. 

 All eyelets set in. The pattern instructions suggested having them set before sewing the back parts to the rest of the corset and I must say it was a smart tip. It was much more easy to manipulate the backs without the rest of the corset.

With finished eyelets I got to try on the corset and make a crease for the waistline where the most pressure  will be. Here I pinned the cotton tape onto the crease to reinforce the waistline. Then I sewed it onto seam lines with stitch-in-a-ditch method.

Half of the corset without boning. I´m sorry for not taking any pictures of inserting the busk. I got so excited of doing that, that I completely forgot and then the job was done. 

Preparing for cutting the bones. Essential tools for this are: tin snips, I prefer these over bolt cutters, needle-nose pliers, you should have two of them, it makes it so much easier to apply U-ends, my other pair is for jewelry making and they do the job,but I will be purchasing another pair for corset-making. And a file in case you need to file off the sharp corners of the steel bones. 

Sewing the bias-binding onto both edges with bones inside. Using the zipper foot to be able to stitch near the bones.
Front and back view of the finished corset. I added lace trim and I embroidered flossing onto all bones. Flossing was widely used on Victorian period corsets and it´s function is to encase the ends of the bones and prevent them to tear through the fabric. It also has a decorative function.

Next three pictures are of the embroidery I embroidered by hand on my chemise. The pattern was from 1880 I think. It was great fun doing this. I used one strand of Mouline (stranded cotton). This is a whitework and I found it pretty impossible to take a clear picture of it! The camera just doesn´t know where to focus and all pictures are a bit blur.
Chemise embroidery.

Now that the embroidery is finished I feel anguish to start a new one. But which one?! I should have thought of it before I finished this one and I should have started a new project. That way I wouln´t feel so lost and I could have just continue my already started new project.

Top flossing. Flossing is made with 3 strands of Mouline (stranded cotton) in pale ice-blue color to match the lacing. 
Bottom flossing.

Front of the corset. Again this was difficult to photograph because the corset is white.

Back of the corset.

Overall I am happy with the outcome. The corset fits very well. I am able to sit and move in it but I can´t bend all the way to reach the floor. I am surprised of this as I used spiral boning that is known to be flexible. Well, I made a truly Victorian corset as ladies back then were not able to bend down hence they put on their shoes before the corset :)

11/02/2016

1840s Printed Cotton Day Dress

Hello!

This is going to be a huge post. :) I love making historical clothes and Victorian period is my absolute favorite. I´ve made a couple of Victorian dresses in the past, mainly using my own pattern and design. I got this marvelous book called Making Victorian Costumes for Women by Heather Audin. Book provides a lot of information about Victorian wardrobe and has seven replica projects from each decade of Victorian period (1870s has two projects). I´ll make all of them ;)

Second book I used as a reference for dropped shoulder pattern is Creating Historical Clothes by Elisabeth Friendship. This is an excellent book as well, mainly ment for professional costume designers as pattern drafting is very labored. All designs start with the basic bodice and then step by step changes are added. So if you want a particular design, you have to draft about 3 different bodices to get it. 

Pattern was supposed to be scaled and then adjusted. I firstly drew the pattern in small version and tried to count the measurements and adjust them as well. After several hours I began to be suspicious that something is not right. Shoulder seam on fronts was way too long for the one in back, same front side seam was longer than back side seam. I don´t know how this would have worked just scaled. I gave up scaling and drew my own pattern taking design features into account. 

Here are my own pattern pieces for bodice: back, side back, front, side front. I changed the side front a bit after this picture has been taken.

Sleeve and bodice shawl front.

Geisha helping me to pick right trims for this project. :)

Heather lace didn´t make the cut. 

What is interesting about Victorian clothes is that the lining is treated as second layer of outer fabric and not as a finished separate layer that would have been sewn into finished outer layer as done these days. All lining pieces are basted to outer pieces. I sewed all darts before doing this to get a neater finish. 

Fronts and side fronts stitched together. I should mention that I am making this dress (and others to come) for myself, for fun and to try new techniques. Since this dress isn´t going to be a museum display and I plan to make many more, I am using sewing machines where convenient (for faster sewing) and hand sewing where it is beneficial. 1840s dress would have been sewn entirely by hand. This bodice is fastened with hooks at back. Since I don´t have a lady´s maid to hook all those hooks for me, I´m using invisible zip as closure. It will make dressing and undressing much faster and difference won´t be seen. 

Pleating the bodice shawl front on the mannequin. This wouldn´t be possible to do without the mannequin padded to required shape. The pleats marked on the pattern didn´t work so I did the pleating without it carefully measuring every centimeter, every gap and pinning to place.

Detail of pleated shoulder.

Bodice shawl front pinned to front ...

... and basted in place.

Pleats sewn in place by hand using hem stitch from bust down. 

Side edge of the bodice shawl front stitched in place by hand using cat stitch. This is super clever stitch I found in the book Authentic Victorian Sewing Techniques, edited by Kristina Harris. It is still used today in couture sewing. Some may know it as catch stitch.

Pattern was suggesting boning for bodice. I thought it would be more practical if I´d use horsehair braid instead. It will be softer and washable. Here it´s being attached using overcasting method. 

Corded piping was used to finish collar and bottom of the bodice. I used piping foot on my Bebe overlocker. It has a groove underneath which accommodates the corded piping. Then I turned the overlocked edge on the wrong side and cat stitched it to place. 

Bottom edge of the bodice prepared for Bebe. 

I was worried about this peak, how it will work. It went fine, I didn´t turn at the peak, I sewed two seams instead. 

Sleeves are embellished with hand sewn faux pleats and lace trim. 

Finished dress photographed with crinoline underneath. 1840s dress would have been worn with large amount of petticoats instead of the crinoline but I just wanted to see how it would look with it. 
I´m quite pleased with the outcome. :)

Side and back view of the dress with crinoline underneath.

4,65 meters wide skirt has been gathered and sewn to bodice by hand using cartridge pleat method.

Here is the dress photographed with chemise and two petticoats underneath and with separate sleeves called engageantes that would have been worn with it. I will have to photograph this dress again when I have finished all the appropriate undergarments.

Engageantes made form embroidered cotton fabric. Hooks and eyes are used as closures at wrist and elastic is holding the sleeve on top of forearm.