Showing posts with label Janome CoverPro 1000CPX. Show all posts

28/01/2017

Imperial Tournure

Wired bustle has been on my "To do" -list for quite a while and I thought now would be a perfect moment to make it. Since I really need it, you know ;) I ordered pattern and supplies for this project as a kit. The pattern I used is the amazing 1887 Imperial Tournure TV163 from Truly Victorian. Pattern contains two bustles in Lobster tail style: Imperial Tournure suited for late bustle era (1880's) and Regular Tournure suited for early bustle era (1870's). I made the Imperial Tournure version. 

Materials used:
  • 2,5m cotton drill
  • 5m 13mm wide plastic coated steel boning
  • 14 U-tips
  • hooks and eyes
  • 6m cotton bias binding

I used coverlocker Cornelia for Front edges of the skirt and for top and bottom edges of the Inner Back. Quick and neat, plus I like the triple row of stitching :)

Sewed and trimmed darts of Front.

The Backs sewed together and seams trimmed with pinking sheers to prevent unraveling. The way they did it back then ;)

Bias binding pinned onto markings. This will form channels for boning.

And my little assistant Dottie couldn´t wait and had to get a picture taken. :)

Back with pinned channels prepared for sewing.

All pieces pinned together. Bottom ruffle attached and trimmed with wide lace trim.

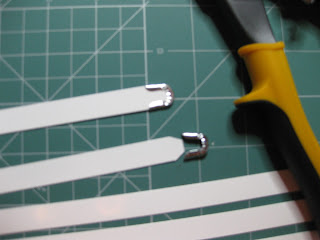
How to fit 13mm wide steel boning into 11mm wide U-tips. Trim the edges. And wear safety goggles!

Finished Tournure, back and side view. I´m very happy how this turned out. It fits perfectly and it was fun to make! I was thinking of making another one in patterned fabric. In fact bustles were often made from patterned or dyed fabric in Victorian times.

A detail of the lace trim.

That´s all folks, have a nice weekend! <3

25/09/2015

Maxi Dresses & Army Shirt


 First lot of my early autumn sewing projects. :)


Maxi dress made in satin fabric. The pattern is from Burda 4/2014 magazine. I sewn this dress as a birthday gift for my sister. She picked the pattern and fabrics herself. This is the second dress I made using this pattern, you can see the first one in here. This dress is sewn on Henrietta, overlocked on Bebe and hemmed on Cornelia


Front and side view of the bodice.


Back view.


Happy owner of the dress. :) My sister <3


My sister is a talented musician and she can wear this dress for her concerts as well as for casual events.


Another maxi dress for myself this time. I had this viscose fabric for this dress for a while and didn´t get to sew it. When I was starting to sew dress for my sister, I figured why not sew this one simultaneously? Having a few machines I don´t have to change the thread color for another project so it was easy sewing them along. This one is sewn on Agatha.


Front and side view of the bodice.


Back view.


Men´s army shirt in medium weight fabric for heavy use. The pattern is from the book Burda Style- Sewing Vintage Modern. This is a modern interpretation on men´s 1940´s shirt. I really enjoyed sewing this one, so many intricate details! :)


Shirt is hemmed on Cornelia with 3 different shades of thread to give the stitching ombre effect.


1940´s collars were so much more stylish then modern tiny ones! :)


Slip dress made in stretch-satin fabric with lace trims. The pattern is from Burda 7/2013 magazine. Slippery stretch-satin fabric was a bit difficult to work with, especially delicate shoulder straps. I made this dress to be worn underneath sheer dresses.


 Lace trim detail.


Stretch-satin top from the same magazine as the slip dress. This top is meant to be worn underneath sheer blouses that I love! I have quite a few chiffon fabrics in my stash waiting to be sewn. Both slip dress and top were sewn on Fiona.


Autumn coat made in college fabric. The pattern is from Burda 9/2013 magazine. I absolutely had to buy this fabric, the print is so beautiful! This coat is sewn mainly on Bebe and details such as pockets are sewn with Henrietta.

21/08/2015

Summer sewing vol.3

Summer arrived in Finland a bit late this year. Whole july was nicely cold and now in august we have to deal with unpleasant warmth. ;) A true Indian summer. Despite of weather I have had a great summer spent with my dear family and friends. I haven´t get to sew as much but I hope autumn will arrive soon and sewing in a cooler conditions will be more pleasant. :)

My first leggings! A great pattern from the book The Great British Sewing Bee- Sew your own wardrobe. Sewn on Bebe, waistband and hem on Cornelia. Made in velvet jersey fabric.

Another leggings made for my friend using shiny jersey fabric. 

Capri trousers made in slightly stretchy woven cotton fabric. Pattern is from the book The Great British Sewing Bee- Fashion with fabric. These trousers are very comfy. I plan to make another pair slightly shorter. I already have the fabric for them! ;)

Pastel yellow blouse with buttoned sleeve in woven cotton fabric. Pattern is from Burda 6/2015 magazine. 
A detail of the button-band.

Interesting collar.

Matching skirt with side-button opening. Pattern is from the same magazine.

Can be worn as a set or separately. I loved sewing these, it was great fun!

Men´s shirt made in woven cotton fabric. Pattern is from the book The Great British Sewing Bee- Sew your own wardrobe.

24/06/2015

Machine Dust Covers

Some of my machines were still missing a proper dust cover. Since I don´t approve of the plastic covers, I made them something nicer. :)

For the Janome CoverPro CPX 1000 aka Cornelia, I made quilted stripey cover in green and white shades:

For stripes I used 100% cotton fabrics for quilting.

I used two home dec fabrics and a lace fabric on top for one side...

... and one home dec fabric, duchess satin and lace fabric on top for the other one. Satin ribbons are topstitched.


Details of decorative topstitching sewn on Henrietta. I used topstitch and embroidery threads.

For Singer 221K Featherweight aka Fiona, I made cover and some accessories. Foot control is stored in its own draw-string bag. Flip-table has its own cover since it hits the screw on the face-plate while turned up and that can scratch the table.


Cover turned upside down turns into a storage bag that fits into Fiona´s case. No scratches on my machine while pulling it out of the case. ;)

Dust cover/ storage bag with hand quilted hexagons. 

Union Jack cushion I designed last year got finally finished too! Blue triangles are replaced with little brown hexagons fitted into the triangles. Diagonal red stripes are topstitched with decorative stitches.

07/03/2015

Janome Coverpro 1000 CPX

I was thinking of getting a coverlocker for a while. Do I really need it? Since I´m never fully satisfied with double needle hem finishes on jersey fabrics, the answer was- yes,I do! 

After researching available coverlockers, I decided to get this one:


Janome CoverPro 1000CPX, nicknamed Cornelia. 

This is also my first Janome machine. So far I´m happy with it but of course I´ll be able to say more after having used her on my projects more.
 I´m also pleased with this machine´s design since I want my machines to be pretty as well as functional.  She´s surprisingly heavy, must have a lot of metal inside. :) 


Side views of the machine.


Back view of the machine.


Standard accessories that have come with the machine: set of needles (it uses EL x 705 system), large and small screwdriver, tweezers, nets, spool holder caps, lint brush, needle threader, attachment screws (for the optional accessories) and accessory box.


I bought these extra attachments (clockwise,starting with the big one): The Cover Hem Guide, Elasticator for attaching wide tapes and Adjustable Seam Guide for quilting etc.
I will be getting other attachments later, such as Tape Binder, Clear View Foot and Center Guide Foot. Oh and the Extention Table is a must! ;)


The machine has extra clear threading guides and needle tension guide on the side.


Test drive- 3-needle cover stitch- jersey fabric, front view. The jersey fabric didn`t need any  needle thread tension adjustments.


Test drive- 3-needle cover stitch- jersey fabric, back view. 


Test drive- 3-needle cover stitch- home dec fabric & cotton fabric, front & back view. Neither these fabrics needed any  needle thread tension adjustments.


My first project with Cornelia- Knit top hem using 2-needle cover stitch. Front & back view. 
This fabric was a bit tricky. I had to play with  needle thread tension and make test drives until I was happy with the result. 


I´ve invaded the kitchen table for testing Cornelia. I had to re-thread her and remove one of the needles for my project. It was very easy. 

I´m very happy with this machine, she will make hemming so much easier and faster!

P.S.: In the back you can see the latest addition to my stitching family, a Singer Featherweight 221K! ;)