Showing posts with label sewing. Show all posts

11/02/2018

1880´s Halloween Dress and Winter Talma

Hello everyone!

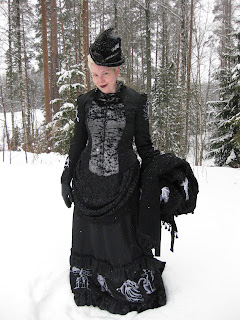
I didn´t get around taking photos of my new 1880´s Halloween Dress and matching winter Talma in autumn but now we´ve taken them, so here they are! The dress and talma were sewed last autumn and the hat last month. Both dress and talma feature extensive machine embroidery.

Here I´m holding the talma in my hand so that the bodice of the dress is visible. It was -4 degrees Celsius and I managed just fine. :)


For the bodice I used pattern by Truly Victorian- TV463 1884 French Vest Bodice. It has machine embroidery on back and both sleeves. Halloween embroidery designs are from Urban Threads: Halloween Glow and Wolf Trio. Skirt hem is embroidered with designs from Embroidery Library: Autumn Glow and Urban Threads: Halloween Glow and Flickering Feline. All the designs are embroidered entirely with Glow In The Dark thread. Skirt and overskirt are drafted by me. Skirt is worn over Imperial Tournure and Winter 1880´s Petticoat.


Details of embroidery on the hem of the skirt.


And here is the Talma worn over the dress. Pattern I used for this is again by Truly Victorian- TV500 Talma Wrap. I love it! Talmas, dolmans and capes are my favorite outerwear. They are so easy to put on and off without distorting the dress etc. Back and edges are edged with decorative tassel trim. Talma is machine embroidered with designs from Urban Threads: Ghost Baroque using viscose machine embroidery threads. I must admit that these designs gave me the idea for this Talma in the first place. :)

Detail of the hat. Pattern for this hat is by Lynn McMasters- Late Victorian Tall Hat. I made the crown in size Small because I´m quite tall myself. The bird is not real, it is a millinery bird made in Styrofoam and covered in feathers. Curved brim was a fun challenge to make. My husband helped me to make the brim-base for blocking the buckram from Styrofoam wreath.

Dragon embroidery on the back.

Another detail of the hat. <3

Talma embroidery: Pumpkin and Bird Skull.

Tree and Rose.

Ghost and Ghost Witch. The witch was a separate design and not a part of Ghost Baroque design pack.

Raven and Bat.

Dragon Smoke, also a separate design, not a part of Ghost Baroque design pack.

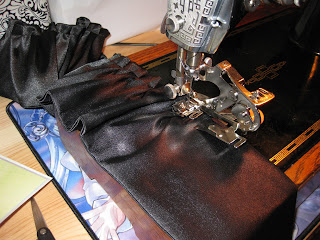
Sewing 9 meters of ruffles for the skirt on my Singer 201K using ruffler foot for the first time. Brilliant device! I shall use it more often now that I know how it works. :)

Thank you for reading and see you next time! :)

21/01/2018

1880´s Christmas Bustle Dress

Hello again!

Please, let me introduce you ... my 1880´s Christmas dress! A little late but better late than never, right? ;) I started working on this ensemble last year a little too late in December, it was 10.12. I think. And with all Christmas hurry I just couldn´t complete it in to weeks. I got it finished in 11.1. instead. But it will be ready for next Christmas. ;) The whole idea for this dress came from a beautiful quilting cotton I found in a store in the beginning of December. It´s the plaid one I used for skirt and faux vest. It is the only material I purchased for this ensemble, everything else came from my stash.


For overskirt I used Truly Victorian pattern (TV362 1884 Wash Overskirt). Great pattern, easy and quick assembly but it eats a lot of fabric! I was lucky I had quite a lot of red tulle lace, but still I had to piece it a bit. For skirt I used my own 3-panel pattern I drafted last year.


Detail of the embroidery. The Blue Jay and Tea Cup design is from Embroidery Library. It´s embroidered by machine using mostly viscose embroidery thread. Then I embroidered beads and sequins around the design. For collar trim I pleated double-face satin ribbon and hand-sewed crystals on it.


Detail of lace applique, beading and sequins. All sewn by hand.


For bodice I used pattern by Truly Victorian (TV463- 1884 French Vest Bodice). This is second time I used this pattern and I love it! It is truly unique how it instructs you to draft the pattern to fit you like a glove. All pieces are flatlined separately, then the bodice is sewn together, boned with 5mm wide spiral steel boning and then lined with cotton lining.


Detail of the hat. The pattern is Bustle Era Hat by Lynn McMasters, view C. Although I love it and it is probably the most beautiful hat I´ve made so far, I have an issue with it- it took 4 hatpins to keep it in place and I still didn´t feel like it is secured properly. The reason why it doesn´t want to sit on the head properly is that the bottom edge of the crown is more curved than the head. I love the outcome but because of this I probably won´t be making more of view C in the future. I´ll option for views A & B I made before and they fit perfectly with just one hatpin.


The materials I used for this project: 

-red striped tulle/lace I used for the overskirt
-horrible skull quilting cotton I used for lining the bodice
-black/silver velvet I didn´t use
-black plaid snowflake quilting cotton I used for the skirt and faux vest
-cranberry quilting cotton I used for bodice
-red guipure lace off-cut I used for appliques
-red satin I used as lining for pleats on the bodice


Here is the leftover of cranberry quilting cotton I used for bodice, you can see I had to place all pieces very strategically to get them all cut out. I got this fabric from my dear friend Liisa, thank you darling! I bet you didn´t guess what will come out of it. ;)


Jia helping to press bodice pieces. :)


Geisha with collar pieces that need to be pressed.


And Chanel found the best possible bed on a buckram I used for the base of the hat.

That´s all for today folks, thank you for reading!

18/01/2018

Petticoats and Bustle Pads

Hello everyone!

I thought I´ll sew some undergarments as they go relatively quickly before I start working on another major sewing project. So, here they are! :)


First one is 18th century basic under petticoat. I loosely based the design on the one in a book The American Duchess Guide to 18th Century Sewing, except I made the closure differently. On each side is a gap for easy access to pockets and front ties tie up in the back and back ties tie up in the front. As a material for the petticoat I used some heavy weight linen blend I had in my stash. Originally I planned to sew cat beds from it but well... Second picture shows front view of a Bum Pad. Pattern I used for it is from Simplicity: 8162. Material for this Bum Pad and other two Bustle Pads in this post was a cotton drill remnant from my Imperial Tournure.


Side and back view of the Bum Pad.


Then I (finally) made 1880´s Winter Petticoat! It is made in flannel (cotton). Pattern I used is from Truly Victorian: TV170, View3 - Late Bustle. First picture shows the petticoat worn over Imperial Tournure and second over Bustle Pad that is shown below. I like the first silhouette better but Bustle Pad is somewhat more practical for everyday wear. 


Side-back view of the petticoat worn over a Bustle Pad.


As the fabric is printed it doesn´t show easily on a photograph, but I sewed all tucks on a flounce that the pattern suggested. This way the flounce stands out nicely.


1870´s-1880´s Bustle Pad on it´s own. As stuffing I used my discarded clean nylon stockings that had holes in them. I cut them to small pieces first. I don´t remember exactly how many there were, but there was a full bag of them. I filled with them all three pads I made and I almost run out of them. Makes one think what a foolish investment nylon stockings are. Certainly not durable at least in my case... I learned my lesson and I plan to purchase in the future only silk, cotton and wool stockings.


Back view of the Bustle Pad.


Small Bum Pad for 1890´s to Edwardian era skirts. The purpose of this pad is to fill the hollow lower back and create more round behind. :)


Back view of the Bum Pad.


Bum Pad worn under Edwardian Petticoat which I forgot to iron before taking the picture. Sorry! 

Thank you for reading and see you next time!