28/01/2017

Imperial Tournure

Wired bustle has been on my "To do" -list for quite a while and I thought now would be a perfect moment to make it. Since I really need it, you know ;) I ordered pattern and supplies for this project as a kit. The pattern I used is the amazing 1887 Imperial Tournure TV163 from Truly Victorian. Pattern contains two bustles in Lobster tail style: Imperial Tournure suited for late bustle era (1880's) and Regular Tournure suited for early bustle era (1870's). I made the Imperial Tournure version. 

Materials used:
  • 2,5m cotton drill
  • 5m 13mm wide plastic coated steel boning
  • 14 U-tips
  • hooks and eyes
  • 6m cotton bias binding

I used coverlocker Cornelia for Front edges of the skirt and for top and bottom edges of the Inner Back. Quick and neat, plus I like the triple row of stitching :)

Sewed and trimmed darts of Front.

The Backs sewed together and seams trimmed with pinking sheers to prevent unraveling. The way they did it back then ;)

Bias binding pinned onto markings. This will form channels for boning.

And my little assistant Dottie couldn´t wait and had to get a picture taken. :)

Back with pinned channels prepared for sewing.

All pieces pinned together. Bottom ruffle attached and trimmed with wide lace trim.

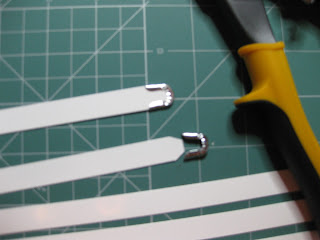
How to fit 13mm wide steel boning into 11mm wide U-tips. Trim the edges. And wear safety goggles!

Finished Tournure, back and side view. I´m very happy how this turned out. It fits perfectly and it was fun to make! I was thinking of making another one in patterned fabric. In fact bustles were often made from patterned or dyed fabric in Victorian times.

A detail of the lace trim.

That´s all folks, have a nice weekend! <3

10/01/2017

Victorian Corset

I finally got around sewing my Victorian corset! Corset is such an important undergarment for historical sewing as it alters the figure a bit and you should always take measurements for historical sewing wearing the undergarments needed for the outfit. 

Here are the supplies I used for this project:

Victorian Corset pattern by Laughing Moon (LM100), I made The Dore Straight Seam Corset. Pattern also includes another corset- The Silverado Bust Gore Corset , a pattern for chemise with three sleeve-alterations and a pattern for open drawers. As main fabric I used heavy cotton drill with no stretch what so ever. For lining I used plain cotton of quilt-weight. Straight busk, 7mm spiral boning, 7mm spiral wire end caps, brass eyelets, boning tape which I didn´t use, cotton tape for waist reinforcement, bias-binding, lace trim, satin tape. 

Pattern cutting with Lupi´s assistance. :) I altered the pattern a bit, added length as I´m tall and some basic fit-adjustments. I got plenty of fabric left, at least for one more corset. I was thinking of dying the fabric. 
I top-stitched a line of decorative stitching on my machine with viscose machine embroidery thread onto both fronts. It is in white so it blends into main fabric a bit. But the light catches the sheen nicely.
Tools for making eyelets: tape-measure, chalk pen, small scissors, leather punch, eyelets and eyelet-pliers. 
Setting the eyelets densely, 17 eyelets per side. I must say I really liked working with pliers, it is so much easier than hammering them and the outcome is smooth. Unlike the hammered ones that always had one side flatter than the other. 

 All eyelets set in. The pattern instructions suggested having them set before sewing the back parts to the rest of the corset and I must say it was a smart tip. It was much more easy to manipulate the backs without the rest of the corset.

With finished eyelets I got to try on the corset and make a crease for the waistline where the most pressure  will be. Here I pinned the cotton tape onto the crease to reinforce the waistline. Then I sewed it onto seam lines with stitch-in-a-ditch method.

Half of the corset without boning. I´m sorry for not taking any pictures of inserting the busk. I got so excited of doing that, that I completely forgot and then the job was done. 

Preparing for cutting the bones. Essential tools for this are: tin snips, I prefer these over bolt cutters, needle-nose pliers, you should have two of them, it makes it so much easier to apply U-ends, my other pair is for jewelry making and they do the job,but I will be purchasing another pair for corset-making. And a file in case you need to file off the sharp corners of the steel bones. 

Sewing the bias-binding onto both edges with bones inside. Using the zipper foot to be able to stitch near the bones.
Front and back view of the finished corset. I added lace trim and I embroidered flossing onto all bones. Flossing was widely used on Victorian period corsets and it´s function is to encase the ends of the bones and prevent them to tear through the fabric. It also has a decorative function.

Next three pictures are of the embroidery I embroidered by hand on my chemise. The pattern was from 1880 I think. It was great fun doing this. I used one strand of Mouline (stranded cotton). This is a whitework and I found it pretty impossible to take a clear picture of it! The camera just doesn´t know where to focus and all pictures are a bit blur.
Chemise embroidery.

Now that the embroidery is finished I feel anguish to start a new one. But which one?! I should have thought of it before I finished this one and I should have started a new project. That way I wouln´t feel so lost and I could have just continue my already started new project.

Top flossing. Flossing is made with 3 strands of Mouline (stranded cotton) in pale ice-blue color to match the lacing. 
Bottom flossing.

Front of the corset. Again this was difficult to photograph because the corset is white.

Back of the corset.

Overall I am happy with the outcome. The corset fits very well. I am able to sit and move in it but I can´t bend all the way to reach the floor. I am surprised of this as I used spiral boning that is known to be flexible. Well, I made a truly Victorian corset as ladies back then were not able to bend down hence they put on their shoes before the corset :)

04/01/2017

Happy New Year Folks!

Hello everyone! I hope you all had lovely holiday and that new year will bring you lots of joy, filled with sewing of course ;) I haven't been posting for a while. Last summer we have been looking for a house since our flat became too small for our hobbies. After seeing about 30 houses we've finally found the perfect one for us. And so we've moved in September.  And I have finally got my own sewing room! Love. love. looove it! Little sewing I got around to, has mainly been mending and sewing curtains and tablecloths (oh yes, my favorite! Not really ;) But now that most of it is done, I can finally start some projects I truly enjoy <3


I got some new sewing gadgets for Christmas I´d like to show you. 
  • Adjustable dress form and polka-dot cover. Thank you daddy! <3 This was really needed since my other dress form has fixed measurements, all too small and most annoying- short back. I noticed it was pretty difficult to work with it while making Victorian boned costumes. 
  • Tailor´s ham and roll for pressing curves. These are really great helpers. I've been looking for them for a long time and when I saw them on the internet I ordered them right away. Great for ironing curves on corsets by the way!
  • Bee´s wax for easy threading.
  • Multi-pack of 4 mm eyelets for corsets.
  • Prym Vario pliers for setting eyelets and washers for corsets etc. These pliers are really good, I can recommend them. First I was suspicious about them and got eyelet machine but eyelets that came with it were poor quality and the machine was breaking them. Prym eyelets didn´t fit the machine so I had to look for an alternative.
  • Prym Tripod Tool for setting eyelets and washers. I got this one as well in case the pliers wouldn´t work but they did so I haven´t tested this one yet.


And a sneaky book webstore sent me a VIP customer voucher. Of course I could not resist and I ordered some books then. 
  • Victorian and Edwardian Fashions from " La Mode Illustree". Great book full of fashion plates in black and white from 1860 to 1914. It has no patterns, only fashion plates. 
  • Lucile Ltd. Beautiful book in hardcover (you don´t see that often these days) full of Lucile´s fashion sketches from 1890s to 1930s. It has mainly Edwardian sketches though. I must say her sketches resemble mine a lot. They are like paintings, realistically colored with porcelain faces, none of the modern non-sense. I´m only mentioning this because in time I got forced by teachers in art school to modernize my sketches. Which I didn´t of course, we all have our aesthetics, right? ;)
  • 19th-Century Fashion in Detail. Quite thick book full of inspiration for designing your own Victorian clothes. Book is divided into sections: embroidery, trims etc.
  • A-Z of Whitework. Great How-to book of whitework embroidery. It has step-by-step instructions with photographs for all whitework stitches. Search Press has published about 20 A-Z books of embroidery, sewing, knitting, crochet. I think I will be collecting them.
  • Costume Close-Up. Georgian patterns from 1750-1790. Patterns can be scaled although I prefer to draft them myself, I find it quicker. Book has detailed B&W photographs of each project and a few in color at the end of the book.


Let me introduce the newest member of our family, a seal point Siamese Dottie! Here she is with Lupi helping mommy to pick fabrics for next quilting project.


Here is the first block of "I love sewing" wall-hanging I will be making this ear. The plan is to make one block each month and get it done by December! We´ll see... This block was made in December.


Dottie insisted I take a picture of her as well :)


And here´s another quilt I started. Flower Spool Quilt by Lynette Anderson. I was thinking I´ll make this as double-bed cover. This one will take LOTS of time since all the pieces are tiny! I have almost finished all the patchwork squares and started making yo-yos. Look at the size of the finished yo-yo, it´s about 1 cm!!! I don´t like this :( And I can´t change it anymore because I have pre-cut all the yo-yos required. And the hexagons are going to be super-tiny as well...


That´s all for today, see you soon! <3